Sunday, November 28, 2010

15 Coolest and Nice tricks for Firefox


15 Coolest Tricks Ever
I think everybody's darling and favorite browser is Mozilla Firefox which is a open- source. And with some add-on's the browser looks pretty cute and stylish. You can make it much better and fast with the following tricks.

1) More Screen Space:-
Make your icons small. Go to View – Tool bars – Customize and check the “Use small icons” box.
2) Smart Keywords:-
If you daily use search box very often then this is an awesome tool that not many people use. Right-click on the search box, select “Add a Keyword for this search”, give the keyword a name. Its an easy to type and easy to remember shortcut name(let's say "favorite") and save it. Now when you want to do an favorite search, go to Firefox’s address bar, type "favorite" that's it you'll get the related items of "favorite" . Instant search. You can do with this in any search box.
3) Keyboard Shortcuts:-
This is where you became a real chic. With these shortcuts your browsing will be super fast. So, here are the some most commonly used shortcuts.
  • Spacebar (page down)
  • Shift-Spacebar (page up)
  • Ctrl+F (find)
  • Alt-N (find next)
  • Ctrl+D (bookmark page)
  • Ctrl+T (new tab)
  • Ctrl+K (go to search box)
  • Ctrl+L (go to address bar)
  • Ctrl+= (increase text size)
  • Ctrl+- (decrease text size)
  • Ctrl-W (close tab)
  • F5 (reload)
  • Alt-Home (go to home page)
4) Auto-Complete:-
This is another keyboard shortcut, but it’s not commonly known and very useful. Go to the address bar (Control-L) and type the name of the site without the “www” or the “.com”. Let’s say “google”. Then press Control-Enter, and it will automatically fill in the “www” and the “.com” and take you there – like magic! For .net addresses, press Shift-Enter, and for .org addresses, press Control-Shift-Enter. Hope everyone know this but these are very cool and time saving shortcuts.
5) Tab Navigation:-
Instead of using the mouse to select different tabs that you have open, use the keyboard. Here are the shortcuts:
  • Ctrl+Tab (rotate forward among tabs)
  • Ctrl+Shift+Tab (rotate to the previous tab)
  • Ctrl+1-9 (choose a number to jump to a specific tab)
6) Mouse shortcuts.
Sometimes you’re already using your mouse and it’s easier to use a mouse shortcut than to go back to the keyboard. Master these cool ones:
  • Middle click on link (opens in new tab)
  • Shift-scroll down (previous page)
  • Shift-scroll up (next page)
  • Ctrl-scroll up (decrease text size)
  • Ctrl-scroll down (increase text size)
  • Middle click on a tab (closes tab)
7) Delete items from address bar history.
Firefox’s ability to automatically show previous URLs you’ve visited, as you type, in the address bar’s drop-down history menu is very cool. But sometimes you just don’t want those URLs to show up (I won’t ask why). Go to the address bar (Ctrl-L), start typing an address, and the drop-down menu will appear with the URLs of pages you’ve visited with those letters in them. Use the down-arrow to go down to an address you want to delete, and press the Delete key to make it disappear. Or simply goto History tab in menu bar and you'll see the links then you can easily delete that particular link.

8) User chrome.
If you really want to trick out your Firefox, you’ll want to create a UserChrome.css file and customize your browser. It’s a bit complicated to get into here, but check out this one

9) Grab files off webpages, even protected webpages
Have you ever wanted a picture, file or video of a webpage but you can’t, because it’s been protected? Just right-click on the page, choose “View Page Info” then the “media” tab. Find the file you’re looking for from the list and click on “save”.

10) about:config
.
The true power user’s tool, about.config isn’t something to mess with if you don’t know what a setting does. You can get to the main configuration screen by putting about:config in the browser’s address bar.

11) Add a keyword for a bookmark.
Go to your bookmarks much faster by giving them keywords. Right-click the bookmark and then select Properties. Put a short keyword in the keyword field, save it, and now you can type that keyword in the address bar and it will go to that bookmark.

12) Speed up Firefox.
If you have a broadband connection (and most of us do), you can use pipe lining to speed up your page loads. This allows Firefox to load multiple things on a page at once, instead of one at a time (by default, it’s optimized for dial-up connections). Here’s how: Look this one

13) Limit RAM usage.
If Firefox takes up too much memory on your computer, you can limit the amount of RAM it is allowed to us. Again, go to about:config, filter “browser.cache” and select “browser.cache.disk.capacity”. It’s set to 50000, but you can lower it, depending on how much memory you have. Try 15000 if you have between 512MB and 1GB ram.

14) Reduce RAM usage further for when Firefox is minimized.
This setting will move Firefox to your hard drive when you minimize it, taking up much less memory. And there is no noticeable difference in speed when you restore Firefox, so it’s definitely worth a go. Again, go to about:config, right-click anywhere and select New-> Boolean. Name it “config.trim_on_minimize” and set it to TRUE. You have to restart Firefox for these settings to take effect. Itz really a cute n cool trick.

15) Move or remove the close tab button.

Do you accidentally click on the close button of Firefox’s tabs? You can move them or remove them, again through about:config. Just you have to do is Edit the preference for “browser.tabs.closeButtons”. Here are the meanings of each value:
  • 0: Display a close button on the active tab only
  • 1:(Default) Display close buttons on all tabs
  • 2:Don’t display any close buttons
  • 3:Display a single close button at the end of the tab bar (Firefox 1.x behavior)

Trick to Hide Audio files Inside Images

Its a cool and useful trick to the guys those who feel to hide their precious audio files from the other users of their PC. There are lots of tools to do this one but with this trick there is no need of installing any soft-wares or tools. It's really cool! and its an example of steganography you can send special messages in recorded audio format that no one would guess evne to your friend in picture format. It is like combining two files into one and when you try to run that file then you'll simply get a image to see. And it can be done in 3 different ways.

First Method--> Combining audio(.mp3) with picture (.gif)
Here is how you have to do it. For example we are going to hide mp3 file inside a gif(Graphics Interchange Format) image file. Make sure that you have the gif file and mp3 file in the same folder. If so then go to command prompt i.e, click on Run (Winkey+R) type cmd.
Go to the drive and folder of those files. Then this is the command you need to use
copy pic.gif /b + impmusic.mp3 /b combined.gif”(Without quotes)


Now once you run the command then you will get a combined.gif in your respective folder. Of course you can use any name for the target file. Just make sure that it has a gif extension.

Now if you open the file it will show up as an image file and the image will be displayed. There will be no indication of the mp3 file at all.
To listen to the mp3 file, you would need to open it manually in Winamp player. It was not working with VLC or Windows Media Player. With Winamp the audio plays fine.

Second Method--> Combining audio(.wav) with picture (.gif)


The other one is to combine the .wav file with .gif file. Now procedure will be same but change the audio file replace the file which is have .wav extension. And apply the command in command prompt
"copy pic.gif /b + audio.wav /b combined.gif"(Without quotes)Now once you run the command then you will get a combined.gif in your respective folder. Of course you can use any name for the target file. Just make sure that it has a gif extension.

Now if you open the file it will show up as an image file and the image will be displayed. There will be no indication of the mp3 file at all.

I have tried to load it into winamp, doesn't play this time. loaded the combined.gif into
windows media player, it also only display the picture but no sound.
looks like only .mp3 sound format is supported.

Third Method--> Combining audio(.mp3) with picture (.jpg)
The third trick is to combine the .mp3 audio file with .jpg picture file. And apply the command in command prompt "copy picture.jpg /b + mine.mp3 /b combined.jpg"(without quotes)Now I have tried to play the combined.jpg in winamp player and it played without any errors. Again, loaded combined.jpg into windows media player, I can only see the picture but no music.

Note:-If you're on a Linux box, you can do it by using the command "cat picture.gif
sound.mp3 > combined.gif"

Translate Your Local Doucuments Instantly with Google Translator Toolkit


Have you ever worried about translating? Have you ever dreamed about sending the whole document to your friend or family member in their dear language? For these strong and tough questions the famous search engine Google provided a gentle toolkit called Google translator toolkit, which helps in translating your whole documents into your pet language.

The standard Google Translation service is pretty good for translating documents that exist on the web but if you ever need to translate Word files that reside on your local hard drive, the translator toolkit will come in handy.


It's an online service where you can upload Word Documents or Text Files and translate from one language to another language instantly.

Google Translator Toolkit
To go into Google translator site just click here. or click here.

It'll be more easy if you are logged into your Google account

The document formatting is more or less conserved and you can download the translated files to your desktop in their original format like Word, OpenOffice or HTML.

Unlike regular Google Translation which is read-only, here you also have the option to edit the translated version of the document in the browser itself.

ORIGINAL TRANSLATED


Friday, June 18, 2010

Prince of Persia: The Forgotten Sands


Prince of Persia: The Forgotten Sands is the latest episode of the Prince of Persia series, and it is an action-adventure video game published by Ubisoft. The first episode of this franchise was released in 1989.The release date of the PC version game is June 8 2010.This game is already launched in May 18 2010 in alomost all console paltforms like PS3,Xbox360,Wii .

The
Montreal studio also worked on Assassin's Creed and Tom Clancy series and they developed James Cameron's Avatar: The Game too.

STORY:

The action in Prince of Persia: The Forgotten Sands takes place after the events from Prince of Persia: The Sands of Time and before Prince of Persia: The Two Thrones. In this episode, the prince visits his brother’s kingdom and discovers that the royal palace is almost destroyed by an evil and powerful army. While he tries to use the Power of Time to save the kingdom and his brother, the prince will start a new adventure and he will discover what true leadership means.

Gameplay

In Prince of Persia: The Forgotten Sands the player has the chance to use some of the old techniques to fight enemies but will also have to try the new elements available. Just like in the previous episodes, the character can fight multiple foes, can perform the acrobatic moves, but what is new, is the fact that he is able to control the powers of nature. This means that the water from a fountain can be solidified and transformed into a bridge or a pillar. Besides these major powers, the Prince can also learn minor powers which can be purchased from a Djinn named Razia. On the Wii version the gameplay is improved by the Wii Remote and the Nunchuk. These two accessories are used to fight, however there will also be some differences between the powers the prince can use and the gameplay suffers some minor modifications

New Features:

Water Element:

Bending the rules of physics and freezing water in midair may seem like a step too far, yet in the world of Prince of Persia.You can freeze the water any where at any time by using time line.After stoping the water, u can run or climb on the water.The timeline is limited for some seconds.

Boss Fights:

This game also contains boss fights at the level endings.There are alot of levels at each level you will be faced by an huge monster it will not be easy to defeat the gigantic beasts.

New Combos:


The combos looks very cool while fighting with the sand enemies. The combat in the game is similar to combat mechanics found in The Sands of Time. The Prince will be able to fight multiple enemies in one battle, up to 50 at once and one drawback is, there is no blocking and there are no quick time events in the game.You can climb on enemies and hit them very hard to the ground.

Puzzles:

The new puzzles are very interesting while playing this game.The puzzle sloving takes alot of time and if u are good thinker then it will be easier for u.The puzzles will be encountered on each and every level before entering into the next level.The prince must do wall jumping and wall running inorder to slove the puzzle.

HARDWARE REQUIREMENTS:

*OS: Windows XP, Vista or Windows 7

* CPU: Intel Core 2 Duo @ 2.66Ghz / AMD Athlon 64 X2 4600+

*RAM: 2 GB

* HDD: 8 GB free disk space

* Graphics: 512 MB Graphics Memory

* Sound Card: DirectX 9 Compatible

* DirectX: Version 9.0c

Supported Graphics Cards:

NVIDIA GeForce 6800 / 7 / 8 / 9 / 100 / 200 / GTX series

ATI RADEON X1600 / HD 2000 / HD 3000 / HD 4000 / HD 5000 series
Laptop versions of these cards may work but are NOT supported.

Friday, June 11, 2010

Top 10 Add-ons in Google Chrome Web Browser


There are a lot of add-ons(or)extensions in google chrome.We will describe about some addons which helps you to run the google chrome in very interesting way...


1)AdBlock Extension:


These is one of the top most extension in google chrome.It blocks ads in the web page before loading, it also block the spam ads in the web page.It has another new feature include filter statistics (hits counter) and the ability to enable or disable individual filters without removing them.

2)Googel Email checker:


Google email checker helps the user to display the unread emails in the inbox whenever u login into your gmail account.It will have a button on right side which indicates the number of unread mails in your gmail inbox , whenever you click that button it redriect the current webpage into your Gmail accont

3)Faster chrome-Browse Faster:


It is another cool extension in the google chrome in which whenever u reach end of the google search page, it will automatically loads the next page just before you reach the end so you don't have to click "Next" and wait.

4)Webpage Screenshot:


Fast and simple extension for google chrome for taking screenshots(or)capturing the whole web page.Just one click u can save the image of any webpage that you are interested into your system.You can save the screenshot of webpage in different formats png or jpeg.


5)Chrome TV:


chrome TV is the coolest free plug-in to watch online TV direct from your browser which out any software.There are a lot of tv channels to view like Entertainment,Movies,Music,Cartoons etc.

6) RapidShare DownloadHelper:


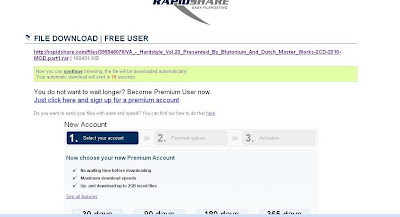
By using this plug-in you can download the rapidshare files one by one without using the premium account.Just click the free user the file will be automatically starts the download once the countdown is over so you don't need to monitor it.

7)Speed Dial:


It's a great extension for adding the number of web pages into the speed dial.we can open the web pages without entering the site address in the URL.

8)Fast YouTube Search:


It is very exciting plug-in for searching the videos in the youtube without going to the website it saves alot of time and searches the videos in the youtube very accurately.

9)MegaUpload DownloadHelper:


This plugin helps the user to download the files from the megaupload without the premium account.It automatically starts download when countdowns are over with super download speed

10)Click&Clean:


Click&Clean plugin deletes all the browser history,Erase temporary files,Clear cookies and Empty cache,Remove Flash Cookies,clean up your hard drives and Free up more disk space, including secure file deletion using external applications, like CCleaner or Wise Disk Cleaner.

Tuesday, June 8, 2010

How to hide files in JPEG pictures


If you’re looking to hide files on your PC hard drive, you may have read about ways to encrypt folders or change the attributes on a file so that they cannot be accessed by others. However, a lot of times hiding files or folders in that way requires that you install some sort of software on your computer, which could then be spotted by someone else and which is also a lengthy process. But this is a cool trick which shows you a new way of hiding the files or folders that you want to keep safe. Using this trick in Windows Operating System, you can actually hide the files inside the pictures with JPEG format.
This is a superb trick which supports you to hide any sort of files inside the picture including .mp3, .exe, .txt etc.
So, here is the procedure you have to follow for hiding the files inside the pictures.
In order to perform this task you need to have WinRAR or WinZIP software installed on your PC. You can download either of these two soft wares from internet.Follow these steps:
  • Create a folder in your hard drive i.e C:\Test and put all the files you want to hide into that folder. Also, place the image that you will be using to hide the files in.
  • Now select the files you want to hide, right-click on them, and choose the option to add them to a compressed ZIP or RAR file. Only select the files you want to hide not the picture. Name it what ever you want, i.e "Hiddenfiles.rar"
  • Now you should have a folder that looks something like this with files, a JPEG image, and a compressed archive.
  • Now here's the important part. Click on Start button and click on Run. Type cmd and press Enter. Now you'll see the command prompt window. Type in in “CD \” to get to the root directory. Then type CD and the directory name that you created, i.e. “CD Test“.
  • Now type in the following line: “copy /b 0436 .JPG + Hidden.rar 0436.jpg”and press Enter. Do not use the quotes.
  • It's better to use WinRAR than WinZIP because of some problems with ZIP format.
  • You can access your hidden file in two ways. Firstly, simply change the extension to .RAR and open the file using WinRAR. Secondly, you can just right-click on the JPEG image and choose Open With and then scroll down to WinRAR. Either way, you’ll see your hidden files show up that you can then extract out.
  • Screen shots for the above process:-


    That's it this is all what we have to do to hide the files inside a JPEG picture. Enjoy with hiding your files inside pictures guyz........have fun.:-)

    Thursday, June 3, 2010

    An Interesting Trick to Hide the Text in Notepad

    A Brilliant Trick to Hide the Text in Notepad

    Here is a small trick to hide the text inside the windows default text editor i.e notepad. This can be done using command prompt. But trick works only on NTFS file system.
    Follow the steps to hide the text in Notepad

    1)
    Open your command prompt Start-->Run type cmd.
    2) Type cd desktop to move to your desktop or cd directory name
    3) Type the below code in your command prompt notepad filename.txt:hidden
    4) Write some text and save it (Ctrl+s).
    5) Now browse to the file location and ope filename.txt you cannot see any data in the file.
    7) To retrieve the hidden data in the file open command prompt and type the same command notepad filename.txt:hidden
    Enjoy with hiding the text

    Saturday, May 22, 2010

    Speed up your hard disk and external hard disk


    Speed up your external hard disk and hard disk by following these steps

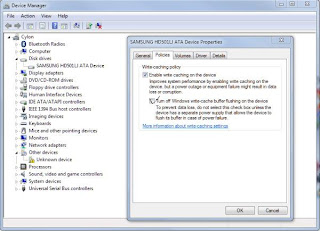
    Write caching is disabled for external drives by default in Windows, so that you can remove external drives without losing any data. Enabling write caching will provide a significant performance increase for external drives

    1. Click Start and type “Device Manager” and open Device Manager
    2. Expand “Disk drives” and right-click your external hard drive and select Properties
    3. click the “Policies” tab and click “Optimize for performance”
    4. Check “Enable write caching on the device” and “Turn off Windows write-cache buffer flushing on the device” then click Ok
    5. Reboot to apply changes

    How to increase your connection speed

    Increase your Internet connection speed

    To increase your connection speed there are some simple methods i am going to describe one among them


    step1:Go to My Computer-> properties


    Step2:Next Go to hardware tab and u will see a Device Manager tab


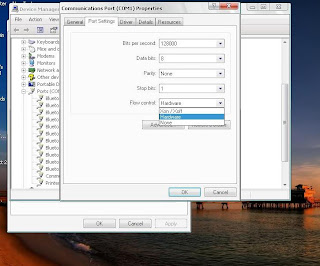
    Step3:By Clicking Devive Manager Tab u will get list of items that are connected and can be connected to your PC then go for portsetting


    step4:double click the PORT(COM&LPT) then u will get list of devices

    Step5:double click the Communication port(COM1),Communication port(COM2)..etc

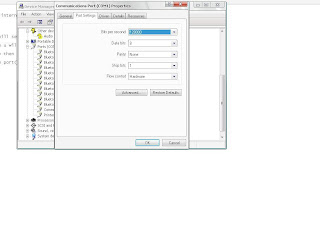
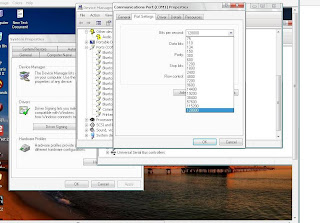
    Step6:After double click communication port(COM1) goto port settings tab


    Step7:In port setting tab There is bits per second and default value is 9600

    Step 8:Change the default value to 128000


    Step9:And also change the Flow Control from none to Hardware

    Step10:Press ok and exit the device manager and restart the pc sp that the changes could be applied


    By doing these steps your internet Connect speed will automatically increases...Thanks for visiting us...have a nice day...

    Saving Time while Installing WindowsXP


    Guyz...this tip will be very useful to those who frequently install Windows XP Operating System. Normally OS installation takes around 40 minutes to complete, due to this you guys will certainly waste the time in this installing process, but through this trick you can save 10-15 minutes time. So, that this time can be useful to you for some purpose. This simple trick goes this way.

    Step 1:- Boot through Windows XP CD.
    Step 2:- After all the files are completely loaded, you get the option to select the partition. Select “C”.
    Step 3:- Now as usual Format the partition, whether it is normal or quick with NTFS or FAT.
    Step 4:- After the formatting is got completed, all the setup files required for the installation are copied.Then it will ask you to restart your system press Enter.
    Now, here begins the simple trick to save the 10-15 minutes time.
    Step 5:- So, after rebooting you will get a screen where it takes 40 minutes to complete or finalize the OS installation.
    Step 6:- Now, Press SHIFT + F10 Key -> Then you'll get the command prompt on your screen.
    Step 7:- Enter “Taskmgr” at the command prompt window. This will open Task Manager.
    Step 8:- Click the Process Tab, here you'll find a process called Setup.exe -> Right Click on Setup.exe -> Set Priority -> Select High or Above Normal. Initially it will be Normal.

    That's it now relax your self and see how fast the installation process will be completed. It's a nice trick and it will really help you in saving the precious time of your OS installation.

    Wednesday, May 12, 2010

    A Funny! trick to make your PC speak whatever you type

    Hey guyz... This is a simple and funny trick which makes your PC to speak whatever you type in your keyboard. With this trick you can create your own text to speech converter software to make your computer speak whatever you type. This is a funny and pretty cool trick. Just run the script file. Copy the code given below in the notepad and save it with any name but the extension should be .vbs i.e "anyname.vbs".
    The scripting code is:
    Dim message, sapi
    message=InputBox("What do you want me to say?","Speak to Me")
    Set sapi=CreateObject("sapi.spvoice")
    sapi.Speak message


    After doing this vbs file just double click on that file and you will get a window like thisThen you can type anything in the text-box of that window. The response will be in the form of speech.

    Enjoy...!!!!!

    Tuesday, May 11, 2010

    Trick to make your Mozilla Firefox run faster...


    Hi....guyz... you are facing the problem with Mozilla Firefox while you are browsing or downloading the files....? Then I think this trick will increase your Firefox speed.
    This is a simple trick which will increase the load time & speed of Firefox and with this you can able to surf the internet faster......

    Follow the simple steps:
    • Type about:config in the address bar. You will get plenty of entries in that look for the following entries and make the corresponding changes to those entries.
    • Make network.http.max-connections-per-server =32
    • Make network.http.max-persistent-connections-per-proxy =16
    • Make network.http.max-connections = 64
    • Make network.http.max-persistent-connections-per-server = 10
    • Make network.http.pipelining = true
    • Make network.http.pipelining.maxrequests = 200
    • Make network.http.request.max-start-delay = 0
    • Make network.http.proxy.pipelining = true
    • Make network.http.proxy.version = 1.0
    • Lastly right click anywhere in the window and select New-->Integer. Name it as nglayout.initialpaint.delay and set its value to 0. This value is the time that which the browser waits before it acts on information it receives. By making the value to 0 the browser can act quickly with the received information......
    Hope this trick will help you to increase the load time & speed of your Mozilla Firefox Web Browser..
    Enjoy...!!!:-)

    Monday, May 3, 2010

    How to change MAC address

    Go to RUN ->type ncpa.cpl...a window will open with net adapters.....
    Right click on the net adapter for which u wanna change MAC address and select properties...


    Go to configure and select advanced tab then go for network address (or) Lan card address...
    You will get an empty field named value...enter your desired MAC address there(no need to insert '-') click ok and you are done....Your MAC address is changed....
    To verify it go to run  'ipconfig /all' or 'net config rdr' and reboot your system...

    Note :-Before giving it a try note your MAC address

    Thanks for visiting have a nice day enjoy :)

    Sunday, March 7, 2010

    Feel easy using Way2SMS

                Its a known fact that way2sms is a best site among free smsing sites of india. But so many of us got little bit frustated of using way2sms site because of its ads, less session time and it is also not so user friendly and hence for all of us Jubin Mitra has developed a great tool ( Jubin free SMS tool ).


    It has two versions

    1. Windows only compatible version (.exe).
    2. A java version (.jar) which is compatible with every OS having JRE installed in it

    Its unique features are

    1. Send group sms with single click. ( no restrictrion of only 25 destination numbers )
    2. Send sms with out any character limit i.e. way2sms restricts user to send only 140 characters message but this tool automatically divides the message into no of parts depends up on size and send them individually.
    3. Phone book options to save your frequent contacts on our PC and also you can load contacts from your way2SMS account.
    4. free from Ads

    Sunday, February 28, 2010

    Hack the Rapid share

    Hi frienz, This is for those who have to wait for about an hour after downloading certain amount of stuff from rapid share. To overcome this time constraint follow these steps:


    RAPID SHARE

    Method 1
    1. Open your rapid share link
    2. Then click on free.
    3. As soon as timer start type this in address bar and click enter "javascript:alert(c=0)".
    4. A pop up message will come click ok your counter is zero just download the stuff.

    Method 2
    1.Delete the cookies in your browser internet explorer or Firefox or opera or whatever u use).
    2.Press start->run,type cmd.
    3.In the command prompt,type ipconfig/flushdns press enter.Then type ipconfig/release,then ipconfig/renew .Now type exit.
    4.Now try downloading, for many people this may work if their ISP provides a dynamic ip.

    Method 3
    1.Just switch off your router or modem) and switch it back on.
    2.This may work for some users Mtnl and Bsnl) and maybe some others too.

    Actually these methods generally work for those people whose ISP gives them dynamic ip.
    If these don't work then one more thing that can be done is to use proxies.

    Method 4
    1.Download the software Hide ip platinum.
    2.Run it, then it will automatically chose a proxy (ip of a different country) for you. So you can easily download without any restrictions. You just have to change the proxy each time you download.

    It's working dudes. Just try and Njoy...
    By, Abhiram

    Tuesday, February 23, 2010

    how to Block Ads while surfing... without Firewall/Ad blocker

    Hi frienz... I'm back again. Many of us get fed up with the damn blinking Ads and their respective URLs while surfing the internet. So, we get frustrated. Better be cool, and just think. If we can redirect a URL (DNS) then we can also Block it [Redirect it to Localhost]. So Why don't use it for Blocking Sites/AD URIs. It would be great to do so without configuring firewall, also many Browsers say Chrome Doesn't Support Plugins like Ad Blocker, so it will be boon for those users.

    So here is the way you can do it.

    > Open Notepad
    > File -> Open -> Copy the quoted text "%systemdrive%\WINDOWS\system32\drivers\etc\hosts" And Press enter to load up the file.
    > It Should Look like the one below.

    Copy the below code....

    # Copyright (c) 1993-2009 Microsoft Corp.
    #
    # This is a sample HOSTS file used by Microsoft TCP/IP for Windows.
    #
    # This file contains the mappings of IP addresses to host names. Each
    # entry should be kept on an individual line. The IP address should
    # be placed in the first column followed by the corresponding host name.
    # The IP address and the host name should be separated by at least one
    # space.
    #
    # Additionally, comments (such as these) may be inserted on individual
    # lines or following the machine name denoted by a '#' symbol.
    #
    # For example:
    #
    # 102.54.94.97 rhino.acme.com # source server
    # 38.25.63.10 x.acme.com # x client host

    # localhost name resolution is handled within DNS itself.
    # 127.0.0.1 localhost
    # ::1 localhost

    > Now Go to Edit -> Select All -> Press Delete.
    > Copy the Text from here and Paste it in the Notepad and Save it.

    Done! Now you should be able to Speed up the net by a teensy weensy bit [Great for Dialup / Net-From-GPRS Users].Plus no more of those irritating images and ADs.

    Enjoy !

    By, M.Abhiram

    Monday, February 15, 2010

    Unknown trick for U

    An unknown trick to hide ur folders by changing it to "Recycle Bin".


    Simple thing u have to do for hiding ur folder is rename the folder with the following extension
    {645FF040-5081-101B-9F08-00AA002F954E}
    for eg:
    If u have a folder of movies press F2 and type the following code
    "movies.{645FF040-5081-101B-9F08-00AA002F954E}"
    Press enter and see the magic :)
    U may think that it can also be done by changing the icon to recycle bin icon but there is a lot of difference between two of them.Icon can be easily found but this trick is not so easy to decode.

    Friday, February 12, 2010

    Restart Your Phone


    For all those Windows mobile geeks and developers who find it really prosaic to press the power button for a long time and then after confirming the power-off, pressing it again just to reboot the device, WM freeware has come up with an application called Windows Phone Rebooter which is a little toolkit that will enable you to conveniently soft reset your Windows phone with just a couple of menu clicks.s we all are aware of the fact that Windows Mobiles do not have an inbuilt menu-driven function to reboot the device, unlike the desktop Windows that users have been familiar with and accustomed to, Windows Phone Rebooter app comes handy here.
    The software also automatically checks the availability of a new version or updates. Access to the Wireless Internet is done in a passive fashion, namely, such an access is tried only when a connection to the Wireless Internet has already been established, e.g. by IE mobile.

    click here to download freeware ...thanks for visiting the blog :)

    COMPATIBILITY :The app has been tested on WM Pocket PC 5 & above though it should work on earlier versions too.

    Wednesday, February 10, 2010

    To extend activation period of windows7 and vista

    Because of the built-in VB script in vista we can increase the trail period by 30 days but it will work only three times i.e, u can extend it for 120 days and the best part is it's not violation of Windows End-User license agreement.

    The following process of extending trail period using script is known as REARMING.

    Step 1:-Goto Start>All programs>Accessories>Command Prompt
    Step 2:-Don't just open command prompt,right click on it and select Run as Administrator.It will take u to this location C:\Windows\system32 .If not,then manually enter the location in ur cmd
    Step 3:-Now just type the below script and press enter
                 cscript slmgr.vbs -rearm
    Step 4:-It will prompt for restart.After restart u will see ur trail period extended by 30 days enjoy have a nice day :)

    Sunday, February 7, 2010

    Small trick to play with others


    It's a very small and easy trick to fool anyone.U can use it in ur labs to fool ur prof's or u can play with ur colleagues in office using this trick.Actually we will make the system look like it's hanged......no icon or even toolbar doesn't works.
    How to do it ?
    1.First take a screen shot of your desktop using the print screen key which lies beside scroll lock key.Now open paint(open run and type mspaint enter)right click the mouse and paste u will see ur desktop image now save it on ur desired location and close the paint.
    2.Next right click on ur desktop wallpaper goto view and unmark the option show desktop icons by this all the icons will disappear from ur desktop.
    3.Now u have to hide ur taskbar to do it right click on taskbar goto properties and mark the option Auto-hide the taskbar and apply the settings.
    4.And now comes the final step goto the location where u stored the print screen image and set it as desktop background.
               After successfully completing the process go to ur desktop u will see ur desktop with all the icons and the taskbar but no icon  will respond because it is image of the screen created by u...

    Note:- Students have to use it carefully.Don't even think to try this trick on Psycho prof's, u will be punished for sure..Have fun thanks for visiting...Have a nice day :).

    Saturday, February 6, 2010

    Boost the speed of your broadband

    Optimize Broadband Cable Modem and DSL Connections to boost the speed of your broadband Internet connection when using a Cable Modem or DSL Router with Windows 2000 and Windows XP..

    1)Open your registry and find the key below.

    2)Navigate to :HKEY_LOCAL_MACHINE\SYSTEM\CurrentControlSet\Services\Tcpip\Parameters

    3)create new DWORD values given below

    DefaultTTL = "80" hex (or 128 decimal)
    Specifies the default time to live (TTL) for TCP/IP packets. The default is 32.

    EnablePMTUBHDetect = "0"
    Specifies whether the stack will attempt to detect Maximum Transmission Unit (MTU) routers that do not send back ICMP fragmentation-needed messages. The default is 0.

    EnablePMTUDiscovery = "1"
    Specifies whether the TCP/IP stack will attempt to perform path MTU discovery as specified in RFC 1191. The default is 1.
    GlobalMaxTcpWindowSize = "7FFF" hex (or 32767 decimal)
    Specifies the system maximum receive window size advertised by the TCP/IP stack.
    TcpMaxDupAcks = "2"
    Determines the number of duplicate ACKs that must be received for the same sequence number of sent data before "fast retransmit" is triggered.
    SackOpts = "1"
    Enables support for selective acknowledgements as documented by Request for Comment (RFC) 2018. Default is 0.
    Tcp1323Opts = "1"
    Controls RFC 1323 time stamps and window scaling options. Possible values are: "0" = disable RFC 1323 options, "1" = window scale enabled only, "2" = time stamps enabled only and "3" = both options enabled.
    TcpWindowSize = "7FFF" hex (or 32767 decimal)
    Specifies the receive window size advertised by the TCP/IP stack. If you have a latent network you can try increasing the value to 93440, 186880, or 372300.

    4)Exit your registry and restart Windows for the changes to take effect.

    Note: These optimized settings may not work with all ISP configurations, in case the parameters should be returned to the default values.Before changing these values make a backup of ur registry.......thank u for visiting the blog ....have a nice day :)


    Thursday, February 4, 2010

    Give the taskbar a clean shave :)

    If u wanna do something new wid ur pc then start with this small code which removes all icons from ur task bar...


    [-HKEY_CURRENT_USER\Software\Microsoft\Windows\CurrentVersion\Explorer\StuckRects2]
    [HKEY_CURRENT_USER\Software\Microsoft\Windows\CurrentVersion\Policies\Explorer]
    "NoSetTaskbar"=dword:00000001
    "NoTrayItemsDisplay"=dword:00000001
    "HideClock"=dword:00000001
    "NoToolbarsOnTaskbar"=dword:00000001
    "NoTrayContextMenu"=dword:00000001
    "NoSaveSettings"=dword:00000000


    paste the above code in notepad and save it as anyfilename.reg........
    If u keep ("NoSaveSettings"=dword:00000001) the taskbar will appear after u reboot ur pc...If it doesn't happen then modify all 00000001's to 00000000's...by replacing 1's with  0's in the code it disables all the functions of the code...
    NOTE:-WORKS WITH XP